
With the huge ‘underwear as outerwear’ trend still ongoing (yay!), I thought I would share my experiences of accessorising or altering the look of my key external lingerie pieces.
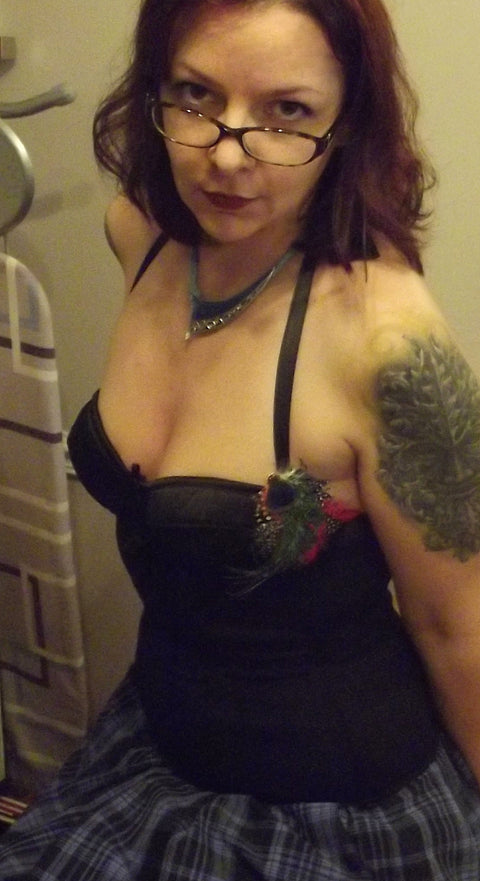
DeVille bra, worn with the halterneck satin straps from the multi-way Vargas dress, peacock feathers, and the blue Alouette waist cincher. (this may also be the only evidence of me and an ironing board being in the same room).
From vast and expensive experience, I can say with absolute sincerity that, provided you respect the material that you are working with and use common sense, personalising your lingerie is simple, fun, and can give you a unique look.
On the flip side – fail to respect the materials at hand, and/or get overenthusiastic and overambitious – and you can ruin a very expensive and adored item in less time than it takes to say “Oh bugg*r!”
Most lingerie is fairly delicate. Even the stuff that holds you in and pushes you up and remoulds your body, seemingly a task requiring huge strength, is fragile and easily damaged. You can’t just stick pins in anywhere, or sew into this and that part blithely. You have to consider where the stresses are placed and where the stretching happens. If you sew or clip a pretty fabric rose onto the side of a corselette, and when it’s worn that part of the fabric stretches, you will rip the fabric without fail. Pinning a string of heavy pearls across the front of a delicate lace bra can be beautiful – if you pin in the wrong place, it can also rip the lace beyond repair.
Before you start, the basics to consider are:-
- Is the piece that you are adding heavy, likely to swing or sway, or be caught and brushed throughout the wearing? If it is, you need to make sure that it’s attached to a strong and inflexible area, with strong large stitches or pins.
- Is the fabric that I am attaching to suitable to the task? Never sew or clip into lace unless you are also going through a couple of layers of stronger fabric underneath. Power net stretches. If you are sewing or clipping onto power net make sure that you do so after putting the item on, so that you don’t put stress onto part of the fabric by stopping it stretch. Never sew or clip power net up into a bunched position, it will cause problems (and looks naf, and can spoil the shape of the rest of the item).
- Do you want to remove the accessories afterwards and revert to a plain item of lingerie? If you are adding a permanent strip of lace or large ribbon bows, the impact on the fabric underneath them is less important than if you are temporarily adding a corsage. Pins, especially large and blunt pins, will leave a permanent mark in fine satin, or rip lace. If you want to remove the decoration afterwards, consider carefully the stress that will be put on the base fabric, and whether it’s likely to leave lasting signs of having been there. In some cases, it does less damage to put a few stitches through with a fine needle than it does to force a huge safety pin brooch clip through. The other benefit of sewing your accessories on is that you can distribute the stress on the fabric though several points, rather than one. Once you get going with personalising lingerie, you might find that your imagination is your only limit (still, heed what I said earlier about overambitious projects! (And respect the fabric!) If, though, you’re still not sure about picking up a needle and some sequins… here are some simple ways to start personalising your smalls, that are pretty much disaster-proof.
Detachable bra straps. These are a wonder and a joy, if you have a few of them in different colours or styles. A halter-neck black satin pair of straps, clipped onto a long-line peach bustier? Paired with a plain black skirt and black and peach corsage… ready to go, and you can guarantee no one else will be wearing the same. You can attach wide straps onto narrow strap fittings securely, but not vice versa.
If you don’t have a selection of straps available but have one strapless bra or corselette that you want to accessorise with different coloured straps, I suggest a trip to your local haberdashery store (or even better, market stall), where replacement metal fastenings and coloured ribbons or elastics can usually be found. If you’re going with ribbons or non stretch straps, I suggest trying halter-neck or making sure that you’ve measured really well – but there’s no reason not to have rigid straps. Examine how your existing straps are fitted together, and just copy them – it’s a really simple job and gives you SO many new looks that it’s worth perfecting.

Vargas multi-way dress, with peach straps and huge peach corsage.
Adding a selection of small corsages or hair clips to the bra straps. This is also a good simple way of upgrading your look, without doing any permanent damage. Elasticated bra straps can take a few pins being shoved through them without stress, as long as you don’t stop them from stretching – if in doubt, pin them whilst wearing so you know how much stretch they are undergoing. Hair clips can be very useful here, as they are often smaller. I tend to put a couple of stitches through the end of the clip and the bra strap, just to be sure that they remain in place. Try a selection of hair fabric roses, 3 or 5 each side, depending on the size. (I always think odd numbers works better, for some reason – but it may just be me!)

With a demure skirt, heels & ffs, it's ready for curry night.
Adding a corsage or two to the front of the bra. This is where you need to be very careful not to rip the underlying fabric. If in doubt, ignore the huge metal pin on the back of your corsage, and get a fine needle instead. Leaving a long tail of thread, put 8 or 9 stitches in a circle, working from the inside of your bra to the outside, through the corsage back, and back into the bra again. Go all the way through each time, and make sure that the stitches are pulled tight enough to hold the corsage against the bra but not tight enough to pucker the fabric. You might need to stitch very loosely to start, in order to get your needle into the corsage without showing, and then tighten the stitches afterwards. If so, work slowly and draw up the slack into one stitch at a time, using your needle to pick up the next stitch and tighten it in turn. Don’t just pull with all your might on the end thread – the fabric will pucker and possibly rip. When you have completed your circle and taken any slack up, tie the beginning and end thread together securely. You want to be able to find these stitches again to be able to snip them loose later, so don’t worry about them being visible from the inside, it’s only on the outside that you don’t want stitches to show.

Adding a little co-ordinating jacket, to make it suitable for curry night, with mum.
Ready made fabric bows and roses. You can get these from the aforementioned haberdashery store or market stall. Or eBay I suppose. (I like the market stall near me, it’s cheaper, and the staff are friendlier. And I feel like I’m actually supporting someone’s business). These are very simple to attach with a fine needle and thread, again, as per the corsage instructions – always work all the way through the fabric and tie at the back if you want to remove them later. It is also less likely to cause stress on delicate lace or satin if the stitches are directly through the fabric, one side to the other, than if you are picking up a few threads of the outer fabric with each stitch. A row of bows down the front of a bra, or along the top of the cups, can give it a flirty, individual feel. Bra straps, again, are excellent contenders for extra embellishment.

Strings of pearls or beads, necklaces or bracelets. Pinning a string or two of pearls over one shoulder strap (especially if you have extra embellishment at the base of the strap) makes a definite impact. If you have a strapless top that actually does stay up, you could even consider pinning a selection of necklaces across completely in place of straps. But don’t try this if you need the support, as it will ruin your necklaces. Multi-string choker length necklaces are also exceptionally pretty pinned from one bra strap to the other and draped across the front of the bust. The essential for this to work is to either sew the ends securely, or to make sure that your safety pins are sharp and rust free. I sharpen mine on a glass nail file to remove any burs or bent tips. Pin into strong fabric or elastic bra strap – long strings of beads will bounce, and they are heavy, and they WILL rip through lace or satin by the end of the evening.

Pinning in an asymetrical pearl shoulder strap, on the DeVille bra & Alouette cincher combo.
Finally – if you’re still doubting about your ability to be comfortable swanning around in your smalls, a cute cardigan is your best friend, especially the wrap around ballet type that lets you tie it loosely or tight to show or conceal as much as you want. After all, it’s confidence and being comfortable with yourself that makes you sexy, not the amount of skin that you’re flashing.